
Classroom Audiovisual (AV) Help
- Lecturing with NYU Zoom
- Schedule Zoom Meetings
- Zoom Recordings
- Zoom Recording in Side-by-Side Mode
- Zoom FAQ's and Training
- NYU Zoom Classroom Instruction
Lecturing with NYU Zoom
Getting Started
- Install the Zoom App (For system requirements, visit the following support site: System requirements for the Zoom application)
- Navigate to https://zoom.us/download
- Select the correct installer for your device
- Complete the installation
- Login to the Zoom App (Once the Zoom app is installed, you will need to login to use it)
- Launch the application
- On the “Sign in” screen, select Sign in with SSO.
- Enter “nyu” when prompted for the company domain.
- Login with your NYU net id and password
Schedule Zoom Meetings
- Schedule a (Standard) Zoom meeting
- Log into NYU Zoom at https://nyu.zoom.us
- Go to the Meetings tab on the left panel.
- Click on the Schedule a Meeting button at the top of the page and enter the meeting information.
- After the meeting details are saved, share your meeting URL with your attendees and/or add the meeting information to your calendar.
- Schedule a (NYU Brightspace) Zoom meeting
- Log into NYU Brightspace and select the course.
- Click the Zoom tool on the navigation bar.
- Click Schedule a meeting at the top of the page and enter the meeting information. Your students will be able to see the upcoming meeting details under the Zoom tab and join your Zoom meeting at the scheduled time.
- Visit this page for detailed scheduling instructions.
Zoom Recordings
- Request Zoom recording feature
- By default, recording is available for faculty but disabled for students and staff. You could check your profile page on nyu.zoom.us to check your privilege. If you don’t have the record permission please contact the NYU IT Service Desk.
- Record a Zoom Session
- Click the 'Record' button on the toolbar to begin recording.
- Pause or stop the recording anytime during the class.
- End the meeting when finished, the recording will save automatically.
- Find the saved video in your Zoom folder to view or share, or if already scheduled, it will display in NYU Brightspace.
- Visit this page for detailed recording instructions.
Zoom Recording in Side-by-Side Mode
The resulting recording will capture the selected layout as it appeared during the meeting. It is highly recommended to test the settings prior to the actual recording to verify the correct display of all elements. If you require a demo of this setup please contact the Courant Helpdek
Overview of Side-by-Side Mode
Zoom Side-by-side mode enables participants to simultaneously view a shared screen and video feeds. This feature proves valuable for presentations or lectures where the visibility of both the speaker and the shared content is essential.
Recording Options
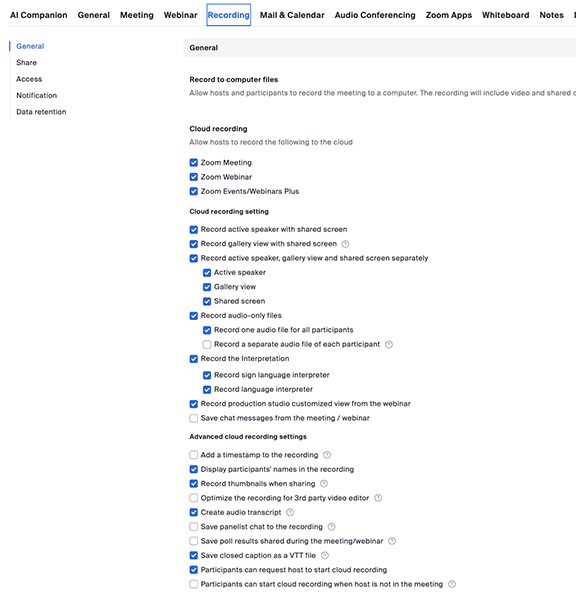
To record a Zoom meeting in side-by-side mode, you must first log in to your NYU Zoom account online at https://nyu.zoom.us. To ensure that the appropriate layout options are available when recording in side-by-side mode, you must navigate to your cloud recording setting. Specifically, go to Settings > Recording > Cloud recording setting and ensure that the following layout options are selected:
- Record active speaker with shared screen
- Record gallery view with shared screen
- Record active speaker, gallery view and shared screen separately
- Active speaker
- Gallery view
- Shared screen
- Review of the optional Advanced cloud recordings settings is also recommended, as these may offer other potentially beneficial features, otherwise, all other settings should remain default.
Procedure for Recording
- Launch your Zoom Desktop app and begin your meeting as the host.
- Navigate to the "More" toolbar section, indicated by the three dots symbol.
- Select Record.
- Upon the conclusion of the meeting,
- Click Stop Recording and end the meeting.
- The cloud service will automatically process and save the recording.
- Once processing is complete, an email containing an access link to the recording will be sent, which can then be shared.
- Additionally, viewers accessing the content through the shared link can adjust the relative size of both the speaker and the content area by dragging the vertical separator between them for a better viewing experience.
Zoom FAQ's and Training
- A complete list of Zoom related articles, guides, training and FAQ's can be found here
Best Practices for secure Zoom class sessions
- Use a new generated session ID instead of your Personal Meeting ID for your class session.
- Use Waiting Room to avoid unexpected guests. Students signed in NYU accounts will bypass the waiting room in default settings.
- Require students to log in to their NYU account to attend class sessions by selecting “Require authentication to join".
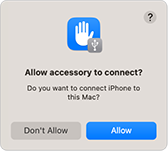
Note: Before using the audio and video equipment in the classrooms, please be aware that if you have a MacBook with Apple silicon, you will need to approve any new USB or Thunderbolt devices you connect. You should see a prompt asking, “Allow accessory to connect?” as illustrated.
If you do not receive this prompt, please go to the Apple menu > System Settings, then select Privacy & Security from the sidebar. Click the drop-down menu next to “Allow accessories to connect” and choose “Always” to permit accessories to connect automatically.
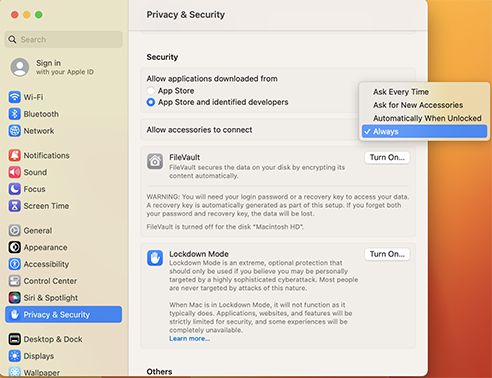
Once you have made this adjustment, you can proceed to select the room audio and video options below.
Universal Zoom Setup Instruction for All Classrooms
- To initiate your Zoom session, ensure that the projector is turned on and the screen is fully extended. (varies depending on the room’s setup.)
- Utilize your laptop as the host for the Zoom meeting. This device will also project your slides or course materials.
- Connect your laptop to the room’s camera and microphone using the designated USB adapters situated in each classroom (USB-C).
- Finally, please remember to click 'record' if you wish to capture it. (more details regarding recording are provided above).
Connecting and Configuring the Camera and Microphone
- Locate the USB Adapter (typically near the podium or front table)
- Make sure the HDMI Camera and Microphone cables are connected on the USB Adapter
- Connect the USB-C Adapter device to your Laptop.
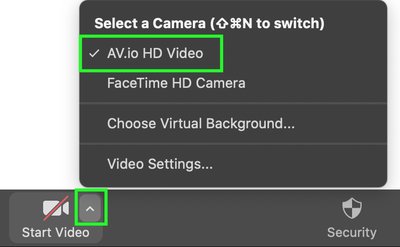
- Configure Video:
- In Zoom, go to ‘Settings’ > ‘Video’
- Under ‘Select a camera,’ choose ‘AV.io HD’ or the available camera option.
- Check ‘Enable HD’ for best picture quality.
- Configure Audio:
- In Zoom ‘Settings’ > ‘Audio’
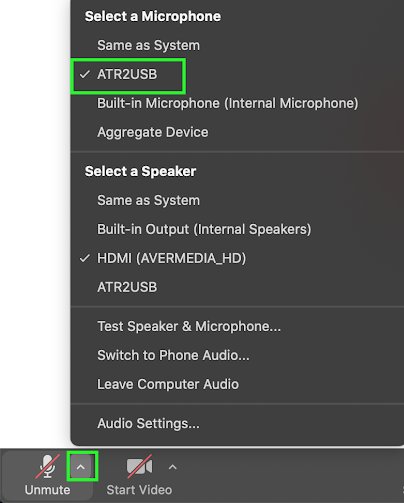
- Under ‘Microphone,’ select ‘ATR2USB’ or the available audio option.
- If available, select the room’s built-in conference microphone device.
- Test the microphone by speaking and observing the input indicator.
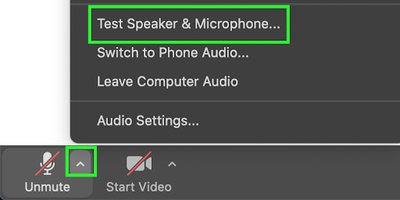
- Use ‘Test Speaker and Microphone’ to verify sound clarity.
- Room Speakers: (optional)
- For most classrooms, the in-room speakers are set up with the projector system.
- Make sure the correct speaker is selected under ‘Select a Speaker’ in Zoom to broadcast the audio in the classroom.
- The option will typically be similar to ‘HDMI Projector’ or a similar HDMI device.
- Ensure the speaker volume is turned up on the room’s control system for clear audio playback.
- Wireless Microphones:
- Ensure the wireless microphone (lavalier or handheld) is turned on and used for optimal audio recordings.
- These connect via the USB setup, select the appropriate device in Zoom.
- Test the microphone in Zoom.
Visual Example:
- If the camera shows a black/grey screen, restart the camera connection.
- If the video shows a green/blue screen, disconnect and reconnect the USB cable, removing any hubs or extenders.
- Ensure ‘Enable HD’ is selected for the best video quality.
- Verify the correct microphone device is selected and test the microphone.
- Make sure the room’s speakers are turned on and volume is adequate for clear sound.